Saturday, October 31, 2009

Apple, Pear, and Cranberry Crisp


Fall has always been my favorite season. I love everything about it - the cooler temperatures, the beautiful foliage, pulling my beloved sweaters out of their summertime hiding places… I especially love the warm and cozy foods that seem to be a perfect match with fall weather. Pumpkins, apples, soups – you name it, I’m probably dreaming about eating it!


Most importantly, when the leaves change colors and the air gets crisp, there is nothing better than spending time with family and friends, indoors or out. This recipe in particular was made for a special dinner with friends. I wanted to make something fruity and full of the best of fall’s flavors. Apples and pears for sweetness and fresh cranberries for pops of tart juiciness – what could be better? This recipe adds citrus juice and zest for brightness and has a crispy, crumbly topping that is just begging for a scoop of vanilla ice cream to go on top. Give in to temptation. It’s worth it.


(Word to the wise: do not be tempted, as I was, to try a raw cranberry just to see what it tastes like. It does not taste like cranberry juice or dried cranberries or cooked cranberries. It is not at all pleasant and may very well have you spitting it out into the sink!)


Apple, Pear, and Cranberry Crisp
Adapted from Ina Garten

Ingredients:
For the Filling:
2 lbs ripe pears (3 or 4 pears), peeled and cut into large chunks
2 lbs McIntosh apples (6-8 apples), peeled and cut into large chunks
1 cup fresh cranberries
1 tsp. orange zest
1 tsp. lemon zest
3 T. freshly squeezed orange juice
2 T. freshly squeezed lemon juice
1/2 cup granulated sugar
1/4 cup all-purpose flour
1 tsp. ground cinnamon

For the Topping:
1 1/2 cups all-purpose flour
3/4 cup brown sugar, lightly packed
3/4 cup granulated sugar
1 cup old-fashioned oats
2 sticks cold unsalted butter, diced
1/2 tsp. salt

Directions:
Pre-heat oven to 350 degrees.

Place the fruits in a large bowl and toss with the zests, juices, sugar, flour, and cinnamon. Pour into a large baking dish.


In another bowl, add the flour, sugars, oats, butter and salt. Combine thoroughly until the mixture forms large crumbles. (Ina recommended using a stand mixer with the paddle attachment. I used my hands – it was just as quick and did not dirty any extra dishes.)


Sprinkle the topping evenly over the fruit, covering the fruit completely.


Place the baking dish on a parchment-lined sheet pan and bake for 50 minutes to 1 hour, until the top is brown and the fruit is bubbly.


Serve warm – preferably with vanilla ice cream.

Serves at least 8.

Wednesday, October 28, 2009

Roasted Brussels Sprouts with Garlic

Brussels Sprouts have a bad reputation. They are many people’s least favorite vegetable, even it seems, some people who have never tried them (based on my informal research). I never ate them growing up, not because I didn’t like them, but because my mom was pretty sure she didn’t like them. I think I tried Brussels sprouts for the first time a couple of years ago at Whole Foods. They had roasted them whole and put them on a big platter in the prepared foods section. Not being afraid of new things (and loving their free samples), I bravely tried one. And another. Much to my surprise, they were good!

Brussels sprouts look and taste like miniature cabbages. When they are roasted, they take on a nutty flavor. Crisp on the outside and tender on the inside, they are pretty darn tasty. This recipe pairs the Brussels sprouts with some roasted whole cloves of garlic that provide additional flavor. If you are not a huge fan of garlic you could skip it, but in my house, we usually add extra.

Roasted Brussels Sprouts with Garlic
Adapted from Mark Bittman’s How to Cook Everything

Ingredients:
1 lb. Brussels sprouts, trimmed and halved
5 cloves garlic, peeled (or more if you like)
1/4 cup olive oil
I T. balsamic vinegar
Salt and freshly ground pepper

Directions:
Pre-heat oven to 450 degrees.

Heat the oil in a large oven-proof skillet over medium-high heat. When the oil is hot, place the sprouts cut-side down into the skillet. Add the garlic cloves and sprinkle with salt and pepper to taste.


Cook without stirring until the sprouts begin to turn brown, 3 to 5 minutes.


Transfer the pan to the oven. Cook, shaking the pan occasionally, until the sprouts are crispy, brown, and tender, 15 to 30 minutes.

Remove sprouts from oven and drizzle with balsamic vinegar. Adjust seasoning to taste. Serve hot or room temperature.

* Note: The Brussels sprouts will look very brown, possibly even a little burnt when they are ready. This is supposed to happen. (The deep color equals crispy deliciousness.) You do, however, want to take care to remove the sprouts from the oven when they are just tender in the center. You don’t want them to be mushy!

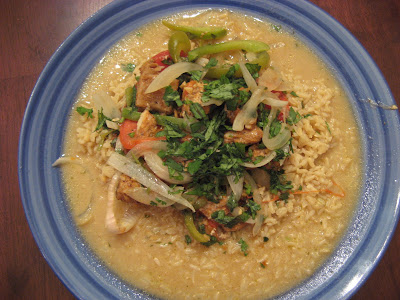
Brazilian-Style Fish Stew


Let me start by saying yum. And oh yeah. This was good. Stan, who as many of you know, is not at all a foodie, could not stop raving about this. For me, that’s about the highest praise there is.


This luscious stew is a take on the traditional Northeast Brazilian dish Moqueca Baiana. The recipe I used called for using fresh salmon. More traditional recipes seem to use primarily firm-fleshed white fish. I took the middle (cheaper) road and used fresh “fish chunks” from Whole Foods that included both salmon and various types of firm white fish. The choice was more economical (at least that day) and was delicious. I really couldn’t decide whether I liked the salmon or white fish better, so I’d advise you to just use whichever you like better.

Quick Coq au Vin

Many serious cooks I know have mixed feelings about Rachael Ray. Love her or hate her, I think she has a pretty great concept – good food that doesn’t require unusual ingredients and can be made quickly. And I must say, her recipes are usually pretty darn tasty. This recipe comes from Rachael’s original 30 Minute Meals cookbook, released before she became hugely famous.

Coq au vin is a traditional French dish consisting of chicken cooked in wine. In France, the type of wine used varies depending on the region of the country, but red wine is the most commonly used. This recipe is a sped up take on the classic, using a combination of boneless, skinless chicken breasts and thighs for a quicker cook time. The sauce is rich and tasty and goes wonderfully over egg noodles.

Quick Coq au Vin
Adapted from Rachael Ray's 30 Minute Meals

Ingredients:
2 large boneless skinless chicken breasts (about 1 1/2 lbs)
3 boneless skinless chicken thighs
2 T. extra-virgin olive oil
1/2 cup all-purpose flour
1 1/2 cups dry red wine
14 oz. chicken broth
3-4 T. tomato paste
8 oz. mushrooms, sliced
1 medium onion, halved and thinly sliced
2 cloves garlic, minced
1/2 bunch fresh thyme, leaves stripped from stem and chopped (about 3 T.)
Course salt and freshly ground pepper

Directions:
Cut the chicken into large pieces. Combine flour, salt and pepper to taste. Dredge chicken in the flour mixture.

Heat oil in a large skillet over medium-high heat. Add the chicken pieces in a single layer. Cook until browned, 4 to 5 minutes per side. Remove chicken from pan.


Add mushrooms, garlic, and onions to pan. Cook until softened, about 5 minutes. Add red wine and scrape up any browned bits stuck to the bottom of the pan. Add chicken broth and stir to combine. Return chicken to the pan and stir to combine. Sprinkle thyme over the chicken mixture.


Bring to a boil. Stir in tomato paste. Reduce heat to medium-low and simmer until thickened, about 10 minutes. Serve over hot egg noodles.

Lemon and Almond Biscotti

Last week I was at the gym using one of their treadmills that conveniently have personal television screens and remote controls, which of course I love. And as is often the case, I turned the TV to one of my favorite channels – Food Network. Yes, I do occasionally feel guilty watching the chefs prepare fatty deliciousness while trying to burn pounds packed on by eating too much of said food. Okay, I really feel guiltier for putting the shows on where my fellow, probably more calorie-conscious, gym rats might be tempted. But hey, they show Food Network on the TVs in the locker rooms too, so I figure what’s a little more temptation going to do?

These biscotti have a lovely, slightly grainy texture from the cornmeal and a bright flavor from the lemon zest. This was my first attempt making biscotti, and it was really quite easy. I even managed to zest my lemons without zesting off a chunk of one my knuckles along the way. That never happens. So maybe these cookies have good mojo. My weary knuckles are sure thanking me. So is my stomach. Try these out, and I’m sure your stomachs will thank you too.

Lemon and Almond Biscotti
Adapted from Giada De Laurentiis
Ingredients:
2 cups all-purpose flour
3/4 cup cornmeal
1 1/2 tsp baking powder
1 tsp salt
1 cup sugar
3 eggs
Zest from 3 lemons
3/4 whole almonds, coarsely chopped

Directions:
Preheat oven to 325 degrees.

Line a large baking sheet with parchment paper.

In a medium bowl, whisk together the flour, cornmeal, baking powder, and salt.

In a large bowl, beat the sugar and eggs with an electric mixture until pale yellow, about 3 minutes. Mix in the lemon zest and then the flour, and beat until just blended. (The dough will be sticky). Stir in the almonds. Let the dough rest for 5 minutes.

Divide the dough evenly into 2 equal mounds and place on the prepared baking sheet. With moist hands, space the dough evenly apart and form into 2 (9 by 3-inch) logs.


Bake for 35 minutes until lightly browned. Cool for 5 minutes. Using a serrated knife, cut the logs crosswise into 3/4-inch-thick diagonal slices. (I did this on a cutting board to avoid scratching my baking sheet.) Arrange the biscotti cut side down on the same baking sheet. Bake until the cookies are pale golden, about 25 minutes. Let cool completely.


* Note: The original recipe called for dipping the cooled biscotti in melted white chocolate. I’m not the biggest fan of white chocolate, so I decided to forgo this step. Plus, without the chocolate, they’re almost healthy!

Welcome!

Welcome to The Well-Fed Newlyweds!

The past year was one of great change for me. I finished graduate school and married Stan, my long-time love. Armed with a master’s degree and a marriage license, I set off to take on the world. Several months of unemployment later, I began looking for something to help pass the time…

I’ve always been an avid cook. I even wrote a cookbook when I was in elementary school. (Guess I was a foodie from the very beginning.) In recent months, faced with more free time than I’ve had in years, I began to cook even more than usual. I decided to chalk up my cooking obsession to newlywed nesting and embrace it, rather than get depressed about my lack of paid employment and resulting inability to go out to eat.

The Well-Fed Newlyweds is an invitation into my kitchen. The recipes I include run the gamut from quick and easy to more time consuming. I really believe that even a novice cook can achieve great results with all of the recipes discussed. It’s just a matter of following the directions. Moreover, I do my cooking in a small apartment kitchen, so size does not matter!

Just a note: Stan and I are big eaters, and I have found that, for us, the listed number of servings for many recipes is not accurate. Therefore, I will not always include serving sizes for my recipes when I feel they vary too widely.

Thanks for checking out my blog. Now let’s get cooking!

LinkWithin

Related Posts with Thumbnails